Pi-Star Configuration for XLX020

Some simple changes must be made to the configuration of a Pi-Star based hotspot before it can access an XLX Reflector. Thanks to our partner in the “020 Project”, Scott <KB2EAR>, who helped with following guidance.

To connect to XLX020 via DMR you must configure your Pi-Star hotspot to use DMRGateway. Before you begin, make sure you hit the update button on the Pi-Star menu.

If you have not yet enabled DMRGateway, you will find the DMR Configuration looking something like this:

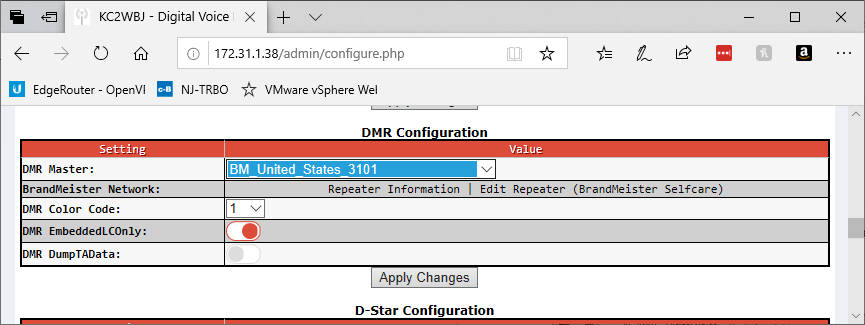
To enable DMRGateway change DMR Master to DMRGateway (very top entry).

Click apply changes and wait for the menu to come back up. Next change XLX Master to XLX_020. XLX Startup Module will usually be either A (Central New Jersey) or C (Beyond New Jersey, including REF020A & Peanut users). Turn on the XLX Master Enable slider.

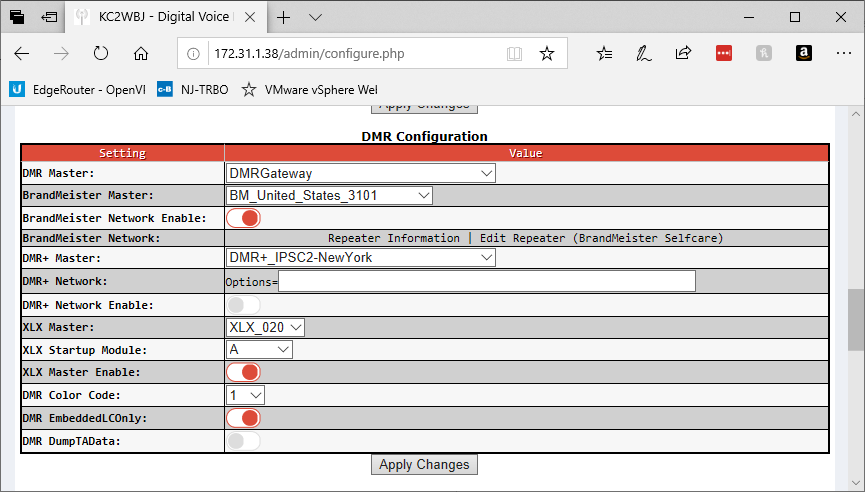
Click apply changes. Once the configuration above has been applied you should be ready to go. Next, program the radio.

To talk via DMR on an XLX reflector, you’ll need to use a channel programmed with TG 6. Also set up a receive group list with TG6 so you will receive signals from the hotspot.

If you want to move your hotspot between reflectors and modules, commands are sent via a private call. These should be entered into your digital contact list.

6 Group Call - Talk on the XLX Reflector
64000 Private Call - Disconnect Channel
64001 Private Call - Switch to Module A
64002 Private Call - Switch to Module B
64003 Private Call - Switch to Module C
64004 Private Call - Switch to Module D
64005 Private Call - Switch to Channel E
64006 Private Call - Switch to Channel F
...
64026 Private Call - Switch to Module Z
65000 Private Call - Query Status
68020 Private Call - Connect to XLX Reflector 020

XLX020A XLX020D is the gateway to the CNJHAM/TG31340 bridge.

XLX020C XLX020A is the gateway to the REF020A/TG31675 bridge.

See you in 020 land.

73

The “020” Reflectors

D-Star users have long known about REF020. Reflector 20, as many call it, is one of the original D-Plus Reflectors. A number of repeaters in the New Jersey/New York/Pennsylvania region link to it, including powerhouse K3PDR in Philadelphia and NJ2DG in Martinsville, NJ. It was recently relocated to the cloud by its operator (Scott KB2EAR) when when the site where the server was housed became unavailable. Historically, the busy channel tends to be REF020A.

During the weeks that Reflector 20 was down, I started exploring D-Star smart groups as a way to get together on the air with some of the folks that I talk to regularly. Smart Group CNJHAM was created on the QuadNet array.

Smart Groups can be a bit confusing on repeaters if you don’t know what group is being used as you come into range. My friend Ray <W2RJR> is playing with a low profile Pi-Star based repeater so we decided that repeater use would be simpler if it could connect to a reflector. Then the only destination route needed is CQCQCQ. So XRF020 was born.

Initially, there were challenges getting XRF020 getting listed in the right directories. You see, there is supposed to be one XRF directory that is authoritative, but not all gateway systems seem to pull data from the same place. Pi-Star uses one list, OpenSpot another, and DV4mini yet another. OpenSpot listed XRF020 right away. DV4mini uses the XLX list and you could have an XRF and XLX using the same number, which is “interesting”. Pi-Star took weeks to list XRF020 until I went to the “top guy”. Then it was handled immediately. Once I learned that XLX reflectors self-register, XLX020 was born.

CNJHAM - Our Central New Jersey smart group conference
REF020 - The original D-Plus Reflector 20 operated by KB2EAR
XRF020 - An XRF Reflector that speaks D-Plus and DCS as well as DExtra
XLX020 - A multiprotocol reflector that bridges digital modes

Here is the lay of our digital land.

Smart Group CNJHAM is where a few of us in the Central NJ area meet up daily. It is more or less our local digital intercom, but you are welcome to stop by and say hello. You can also say hello via XRF020A and XLX020A, as well as REF020D. They are all linked. The NJ2DG-C repeater is linked to REF020D, so you can get in that way too.

         CNJHAM <==> XRF020A <==> XLX020A <==> DMR/YSF
|
REF020D

If you’re an REF020 user, then you’ll want to know that REF020A is linked fulltime to XLX020C. You can connect to the XLX side of things via DMR, D-Star, or YSF. You can also get in via PA7LIM’s Peanut.

             REF020A <==> XLX020C <==> DMR/YSF/Peanut

See you in 020 land.

73

London Travel Tips Part 2

VAT stands for “Value Added Tax”. It is a bit different from the sales tax that Americans are used to. It is a tax that it is added at every step along the supply chain where value is added. In the United Kingdom the VAT rate stands at 20% for most purchases. This makes prices on your London shopping spree seem higher than in New York.

The good news is, if you are not an EU resident (pre-Brexit), you can get a VAT refund on items to be taken from the country under certain circumstances. The VAT refund process in the UK is different from what I’ve seen in other EU countries.

In the Netherlands, for example, if you spend over a certain threshold at a shop and, if the shop owner is aware of the VAT refund paperwork, you’ll get a form that needs to be shown at a customs window at the airport. Sometimes you’ll also be asked to show the merchandise purchased to prove that it is leaving the EU. The customs officer will stamp the form and you mail it to the vendor for the refund. You can do this once when leaving the EU for all items purchased, even if purchased in other EU countries on the same trip.

One year at the Friedrichshafen Ham Radio show I purchased a nice handheld digital transceiver which cost about double in the USA at the time. In this case, the vendor’s bank charged a hefty wire fee for the transfer to my bank. The fee ate up much of the refund. The wire fee is avoided if the vendor participates in a program called Global Blue. In that case, Global Blue will refund the VAT directly to your credit card. This is the ideal situation and you get the full amount of your tax refunded to your credit card in the currency used for your purchase.

The UK, however, does things a bit differently. They have outsourced the VAT process at Heathrow to the money changing behemoth Travelex. Travelex makes its money by charging fees to move money between currencies. In this case, they are taking a percentage of the VAT and then charging you again for a currency exchange because they want to refund your VAT in US dollars rather than credit the full amount back to your credit card as Global Blue does. At least this is how it went down during our recent trip. Expect to get only about 11% back.

The transaction took place so quickly that I did not have time to think about it until afterward. Next time, I will insist that they refund the VAT in the currency of purchase to the credit card used for the purchase. We’ll see how that goes and if it results in a larger return.

Another unusual aspect of the Travelex VAT process is that it takes place outside of the security screened part of the airport. So, they don’t even really know that the merchandise or you are leaving the country that day. Strange indeed.

April 1 DMR Security Update

A new security implementation for DMR repeaters has been announced.

It is called “Color of the Day”. The color code will be randomized and rotated daily to ensure that only those with the correct seed will be able to access repeaters. To get the seed you need to make a Paypal donation to the Amateur Radio Security Cabal Inc. This is a not-for-profit organization of amateurs interested in security and is located in Lichtenstein.

For further information please Google “Aprilscherz”.

Setting up a STARnet Routing Group

Last month I wrote about callsign routing in a D-Star environment. I mentioned that it is possible to create your own Starnet routing group for you and your friends to chat on. If you’re running Pi-Star, here is how to do it.

On the Pi-Star Expert Editors menu, select ircDDBGateway. This component (written by G4KLX) of the Pi-Star distribution contains the Starnet server. Starnet uses callsign routing to set up a group which can be subscribed to by any valid user on the same network. In this case, we’re using the default network run the the QuadNet team (rr.openquad.net).

You’ll have to pick a name for your group. The ideal Starnet group name is not a valid call sign and is 6 characters long. This leaves room for a space and a subscribe/unsubscribe character. So it looks like this:

MYGRUP   -- Group name

MYGRUP A -- Subscribe to MYGRUP

MYGRUP T -- Unsubscribe to MYGRUP

In the ircDDBGateway config, you’ll need to change the following:

starNetBand1       A
starNetCallsign1 MYGRUP A
starNetLogoff1 MYGRUP T
starNetInfo1 What my group is about

You’ll see some other Starnet options but it is ok to keep the defaults for now. Once you know what you’re doing you can tinker further. You can even setup multiple groups. There is also an option to link your Starnet group to a reflector, but please do not do so without the permission of the reflector operator. But if you want to test this, you can try XRF020E, which I have reserved for experimentation.

Note: The address of XRF020 is not yet current in the Pi-Star file listings, so until it is updated you’ll have to manually edit /root/DExtra_Hosts.txt with the following:

XRF020        xrf020.k2dls.net L

Once you see your group listed in the QuadNet directory under Legacy STARNet groups, you can set your D-Star destination call (URCALL) to MYGRUP and chat away. Just remember that MYGRUP is an example only, and you’ll need to pick your own unique name that is not already in use.

You’ll also likely have to forward port 40000 (the ircDDB port) on your router to the internal address of your Pi-Star installation.


It may not be like having your own private repeater, but for many D-Star hams, it is the next best thing.

73

London Travel Tips Part 1

We recently returned from a nice visit to London. While temperatures were only in the mid 50s F, we’ll take that any day over the deep freeze that New Jersey has recently experienced.

f

I want to share two things that will make a visit to London more enjoyable. In this first of two posts, we’ll take a look at the Visitor Oyster Card. I don’t know why it is called an Oyster — it is a proximity card — but if you plan to use the various services provided by Transport for London (TfL) to get around, you’ll find it to be most convenient. It can pay your fare from Heathrow, in and around London on the Underground, and on buses and more. It features daily and weekly fare caps, so once you spend a certain amount, you don’t incur further charges during that time period. And, pay as you go fares are cheaper on the card than if you purchase individual tickets.

You can order your Visitor Oyster Card online or you can buy it at the Visit London shop at Heathrow. We put £40 on each card and at the end of a busy trip, we still had £10.10 left. And that proved to be fatal. The automated ticket machines will refund any balance up to £10 to your credit card and you can keep the card for future use. That extra 10 pence caused me to have to get personal assistance with the refund.

There is a £5- deposit (or activation fee) on the card which used to be refundable. It is no longer refundable. When I went to the window to cash out the 2 cards, I was given £20.20. But, to my surprise, the cards were cancelled and not returned. I had expected to either get the £5 deposit or the cards returned. Instead, I lost £10 on the deal. There used to be references on the TfL website which stated that the card can be emptied and retained for future use. I showed a PDF document from their website to the representative which clearly stated that the card would be returned.

Based upon my inquiry, it looks like those references were removed from the TfL website. Apparently, the policy was changed last year. The supervisor at the Heathrow Visit London office near Terminal 3 informed me that the change had something to do with GDPR. I am skeptical that TfL’s retention of the card I used for holiday travel somehow protects my privacy.

Lesson learned #1 — If you have a balance on your Oyster Visitor Card, keep it for a future trip. It never expires.

In Part 2, we’ll discuss VAT refunds and how not all refunds are created equal.

Adventures in Callsign Routing

Callsign routing has been around since the earliest days of D-Star. It has also been little used. However, with the proliferation of Pi-Star based hotpots, callsign routing and D-Star have been given new life. Your Pi-Star installation includes a piece of software called ircddbgateway. It truly is a gateway to a whole new way of looking at D-Star.

The first piece of the puzzle is to get comfortable with callsign routing. I invite you to give me a direct call on my D74A HT. To do that, you’ll need to configure your radio with a memory that is setup to use your Pi-Star as a gateway. While that is outside the scope of this article, the general idea of the D-Star configuration (using the ficticious callsign N0TME) is:

 R1: N0TME B ; For a B (70cm) module
R2: N0TME G ; To use as a gateway
MY: N0TME ; My callsign

Now for the fun part. Normally, you’d use CQCQCQ as the destination callsign. This is the standard if using a repeater or a reflector. But, you COULD put a callsign in that destination field. Put “K2DLS P” in the destination and if I’m around, I’ll answer. Note that the P identifies my portable and must be in the 8th character position of the destination (UR) field.

There are also destinations that are not individuals, but are Smart Routing Groups. Try DSTAR1, for example. That is a very active routing group operated by the folks at QuadNet and it offers a lot of multiprotocol connectivity. There is even a net where users check in from D-Star, DMR, and Fusion and everyone can hear everyone else! Be sure to disconnect when you’re done (DSTAR1 T).

You can also configure your own legacy Starnet group on your own Pi-Star for you and your friends to chat on. This can be found on the expert menu for ircddbgateway. We’ll talk more about this in a future post.

In the meantime, I’m waiting for your call.

Turn off HDMI on Pi-Star (Easier)

Here’s an even easier way to turn off HDMI on your Pi-Star image running under Raspbian. If you’re running one of the Pi-Star 4.0 release candidates, the tvservice command may already be installed. You can check by issuing the following command:

which tvservice

If it is installed, just add the HDMI off command to /etc/rc.local.

# Turn off HDMI
/usr/bin/tvservice -o

If you’re running Pi-Star 3.x, I learned that you can install tvservice from a .deb package.

sudo apt-get install libraspberrypi-bin

For some reason this did not turn up during my initial searches but was pointed out over in the Pi-Star Forums by Dennis (W1MT).

It also seems that Andy (MM0MWZ) is considering adding a button in the future which would allow turning off HDMI from the web interface.

Turn off HDMI on Pi-Star Image

It is common practice on headless Raspberry Pi computers to turn off the HDMI to save some power. Even without a monitor attached, the HDMI hardware seems to draw ~ 50 ma of current. However, in the interest of saving space in the image, Pi-Star (as distributed) lacks the necessary tvservice command to turn off the HDMI hardware.

This command is part of the Raspberry PI “userland” package, which for some reason is not packaged as a .deb. So you’ll have to grab the code off github, but it is pretty easy. Before starting, make certain that you have expanded the filesystem of your image to fill the SD card.

sudo pistar-expand
sudo reboot

After the reboot, do the following:

rpi-rw
git clone https://github.com/raspberrypi/userland
sudo apt-get install cmake -y
cd userland
./buildme

Add the libraries to the ld.so search patch by creating a file named “userland.conf” in /etc/ld.so.conf.d. In that file add the following line:

/opt/vc/lib

Next, update the ld.so search path:

sudo ldconfig -v

You can now run the tvservice command:

## Status
sudo /opt/vc/bin/tvservice -s
## Turn off HDMI
sudo /opt/vc/bin/tvservice -o

All that is left to be done is to add the HDMI off command to your /etc/rc.local file so that it will run every time the system boots.

Will Opaqueness Kill Brandmeister?

In response to the ill-advised Brandmeister ban on the DV4mini devices by Corey Dean (N3FE), I approached some of the key personnel behind the Brandmeister DMR system to determine if I could put up a new master server in the USA. The purpose of the server would be to support the stations requiring extended routing who had been disenfranchised by N3FE.

Most of the Brandmeister core team do not publish email addresses, but I was able to get in touch with Yentel (ON3YH). He indicated that he was not active any more in the development process, but said the he would pass on my message to Artem (R3ABM) and Rudy (PD0ZRY). After a couple of weeks with no further response, I tried some social media channels where I put the following questions to Artem and Rudy:

“Does Brandmeister have a policy which supports the action of the USA Administrators who disabled access to TG 4999 (extended routing)?

“Thousands of USA users who require access to extended routing have been abandoned by the current admins. Therefore, I propose to put up a new master server in the USA which will support those abandoned users by explicitly supporting extended routing. Will you permit/support this?”

Finally Artem came back to me. Not with a straight answer mind you, but a roadblock:

“Please discuss this with Corey Dean”

Talk about opaque. Not a yes, not a no, not a statement of policy. Not an answer on behalf of the core development team as to whether they support the actions of the USA team. Rather, appeal your execution to the executioner and don’t bother me. This is not exactly an answer in keeping with the amateur radio objectives of mentoring and experimentation.

The team running Brandmeister has a published list of policies. Policy number 9 for master server operators is:

“Promote a positive image of BrandMeister”

It seems that the leaders of this project could better comply with their own policies. Their image is not looking too shiny to me right now.

What happens next? What if someone decides that MMDVM boards made in China or Kenwood repeaters or you fill-in-the-blanks are not to their liking and decides to ban them? It is ironic that the Brandmeister project sprang up because of the closed nature of the DMR-MARC C-Bridge networks which preceeded them. The Brandmeister devs were the freedom fighters.

Now, they are the bureaucrats.