If you attended my presentation, thank you for your interest. If you have never attended a Winter SWL Fest and are interested in any aspect of radio reception, consider attending next year. All frequencies from DC to Daylight are fair game.
I had the opportunity to catch up with Mike Carper, WA9PIE, at the Orlando Hamcation today. Mike is one of the two current owners of Ham Radio Deluxe, the incredibly popular software used by radio amateurs to control their radios and handle logging and other tasks. HRD Software LLC went through some rough times in 2016, but Mike reports that 2017 was a great year under reconstituted management.
Mike Carper, WA9PIE, owner of HRD Software LLC
In 2017, Roger Hardin joined the company as a full-time software developer. In 2018, Mike plans to add several developers to address a backlog of bug reports as well as work on new feature releases. Joining the team on a part-time basis is well known radio amateur Tomas Hood, NW7US. They plan to follow an 80/20 approach. Mike anticipates that 80% of the effort will be devoted to correcting software defects and 20% will be devoted to rolling out new features.
In addition to addressing customer concerns around QSL label printing and Cabrillo contest log generation, there is a planned major change around how rig control definitions are handled. Mike announced at Hamcation that they plan to externalize rig definitions via XML. This means that end users will gain the ability to tweak features and implement their own definitions. Watch for this sometime later in the year.
Mike has also instituted a lot of process around documenting customer reported incidents as well as software development and testing. The process has led to a more transparent approach to product changes. Any customer can now view a change log to see what issues have been addressed in a particular release via the web. The User Manual has also been converted to an online wiki format.
Thanks to Mike for the update. I’m looking forward to continued development of Ham Radio Deluxe.
Note: This article was originally published in March 2017. I’ve revisited and updated it in preparation for a talk that I’ll be giving at the 2018 Winter SWL Fest. I’ve simplified the installation process. While doing so, I learned that Google now requires an API key for the application to have access to their maps. My github fork of the dump 1090 code has been updated to account for this development.
A key component of next generation air traffic control is Automatic Dependent Surveillance – Broadcast (ADS-B). The current FAA mandate is for all included aircraft to output ADB-B transmissions no later than January 1, 2020. But you don’t have to wait to receive and map ADS-B. There is a lot of air traffic to be seen.
dump1090 as viewed via a remote web browser.
Some folks are using complete downloadable images that are set up to feed flight tracking services such as FlightAware. If you’re interested in doing this, The SWLing Post featured an article that you’ll enjoy. I wanted to explore whether I could use some items already on hand to see a map of overhead aircraft on any computer on my home network.
I pulled out an older Raspberry Pi Model B and a 4 GB SD-Card and installed a copy of Raspbian Stretch Lite. The Model B has been retroactively called a Raspberry Pi 1 Model B. It is equipped with 512 MB of RAM, two USB ports and a 100mb Ethernet port.
I decided to use a spare older RTL-SDR stick based on the RTL2832U and R820T chips. This USB device comes with a small antenna that I hoped would be good enough to get me started. It is not in any way optimized for the 1090 MHz signals that are used by ADS-B and is roughly 19 parts per million (ppm) off frequency. It cost a bit over $10 at a hamfest a couple of years ago. The designs have improved since the early models were offered. Newer models include a TCXO (thermally compensated crystal oscillator) for stability and accuracy.
I needed software to take signals from the RTL-SDR stick and plot them on a map. That software is “dump1090”, originally written by Salvatore Sanfilippo. I added an install stanza to the Makefile, along with a systemd service file, for a smooth system install. I also needed to install the RTL-SDR USB drivers. The complete installation runs “headless”, meaning no monitor, keyboard or mouse need be connected. Remote management can be done via ssh.
There is a security change that comes along with Stretch. ssh is now disabled by default. After copying the initial Stretch image to the SD card and BEFORE removing it to place the Raspberry Pi, mount the boot partition and create an empty file named “ssh”. If you are not using ethernet, you could also pre-configure wifi settings.
First, bring the Raspbian Stretch installation up to date.
–quiet runs in the background
–net starts a webserver so that you can access via a web browser
–lat set to YOUR decimal latitude (negative for South)
–lon set to YOUR decimal latitude (negative for West)
–ppm if you know the ppm tolerance of your device (otherwise omit)
–gain -10 which sets gain automatically
A full parameter list can be reviewed by typing dump1090 --help.
With an antenna connected you can perform a quick device check by typing dump1090 --interactive. If all is well you’ll see a screen like this:
Hex     Mode  Sqwk  Flight   Alt    Spd  Hdg    Lat      Long   Sig  Msgs   Ti/
-------------------------------------------------------------------------------
A39D11  S                                                         6     1    4
A25D36  S                     1775                                7     4    3
AAA593  S                     2575  205  075                      7     2    7
A25238  S                                                         4     1   12
A0480B  S                    19650                                8    28    3
ACF4DD  S                     3825                                7     2   14
A41F61  S           FDX3018   2800  211  025   40.428  -74.332   23    83    0
A6FFFE  S     1753  LXJ550   30475  371  226                      8    63    0
C060B3  S                     4625                                6    14    1
ACF69B  S                    23250                                6    25    1
A2D27C  S                    24000                               13    42    2
A0BF90  S                     9500  249  257                      5     3    9
A7D30A  S                    40000                                8   111    1
AE0192  S           SPAR958  32675                               22    93    0
ACC040  S                     7825                                8   146    2
ACA5DF  S                    26600                                6    79    0
A80C7B  S                     4550                                9   108    1
A7CC00  S                     7825                               35   123    0
ACF841  S     1507           14425                               50   132    0
A8C802  S           NKS149   23575  332  216   39.995  -74.262   12   160    0
A61949  S           UAL1105   2725                               14    60    0
AC2E20  S     1006           19925                               22   130    0
AB766A  S           DAL1526   8525  216  038   40.444  -74.213   81   249    0
AA4440  S                     5400  253  066                      6     6   13
Control-C exits this screen.
Now start the dump1090.service.
sudo systemctl start dump1090.service
If all goes well, a netstat -an will show that there is a binding to port 8080.
tcp 0 0 0.0.0.0:8080 0.0.0.0:* LISTEN
Now you can start up a web browser from any computer on your home network and see a map of planes overhead. If your router supports internal dynamic DNS you can name the RPi and access via something like http://skynet:8080. Alternatively, use the IP address, which can be obtained via ifconfig.
In this case, the URL would be http://192.168.1.123:8080.
Once the map appears, re-position it to your part of the world and enjoy learning about what is flying overhead. You can enhance your enjoyment by listening to your closest airport tower or air traffic control frequencies on a scanner. These transmissions use amplitude modulation (AM) and can be monitored an another RTL-SDR stick or a scanner, even a relatively old model.
I’ve been a fan of internet radio appliances ever since the AE1 hit the market in 2006. I still find them to be more convenient than using a smartphone paired with a bluetooth speaker. However, my Grace models, a few years old now, stopped working with Sirius a couple of years ago. It was the same with a Logitech Squeezebox. Google Home provides a decent way to access Pandora and TuneIn, but not Sirius.
Our kitchen counter has added a new Kelement WiFi Internet Radio and I like it. It is an appliance based upon an Android screen and familiar apps, along with two speakers and a subwoofer. No, the sound won’t blast you away, but it is fine for the $80 I paid during Black Friday/Cyber Monday. The price on Amazon is now $90, but I would still recommend it at that price.
It is nice to be able to again listen to Sirius while downstairs and the Android touch screen interface makes sense.
The K2DLS DV4mini image for the Raspberry Pi 2 and 3 (only!) has been updated to include the October 12 release of the DV4mini Control Panel. This includes XRF through letter Z and REF up to 100 for the D-Star users. The image will fit nicely on an 8 GB SD Card.
Most of us are familiar with the SAME codes used by NOAA Weather Radio All Hazards transmissions. They allow the radio to be unmuted for Warning/Watch/Advisory (W/W/A) announcements for a county or zone. I thought it would be a good idea to add W/W/A functionality to my existing APRS station. I have been transmitting and iGating local weather readings via APRS for a number of years as part of the Civilian Weather Observer Program (CWOP).
My APRS station uses aprx software. aprx runs under Linux, so I run mine on a Raspberry Pi Model B with Raspbian. aprx supports the ability to run an external program as a beacon. I wrote my program (noaacap.py) to be run by the aprx beacon exec function.
noaacap uses the NOAA CAP (Common Alerting) protocol and the Atom feeds published by the National Weather Service. Installation is quick and simple if you have a running aprx system.
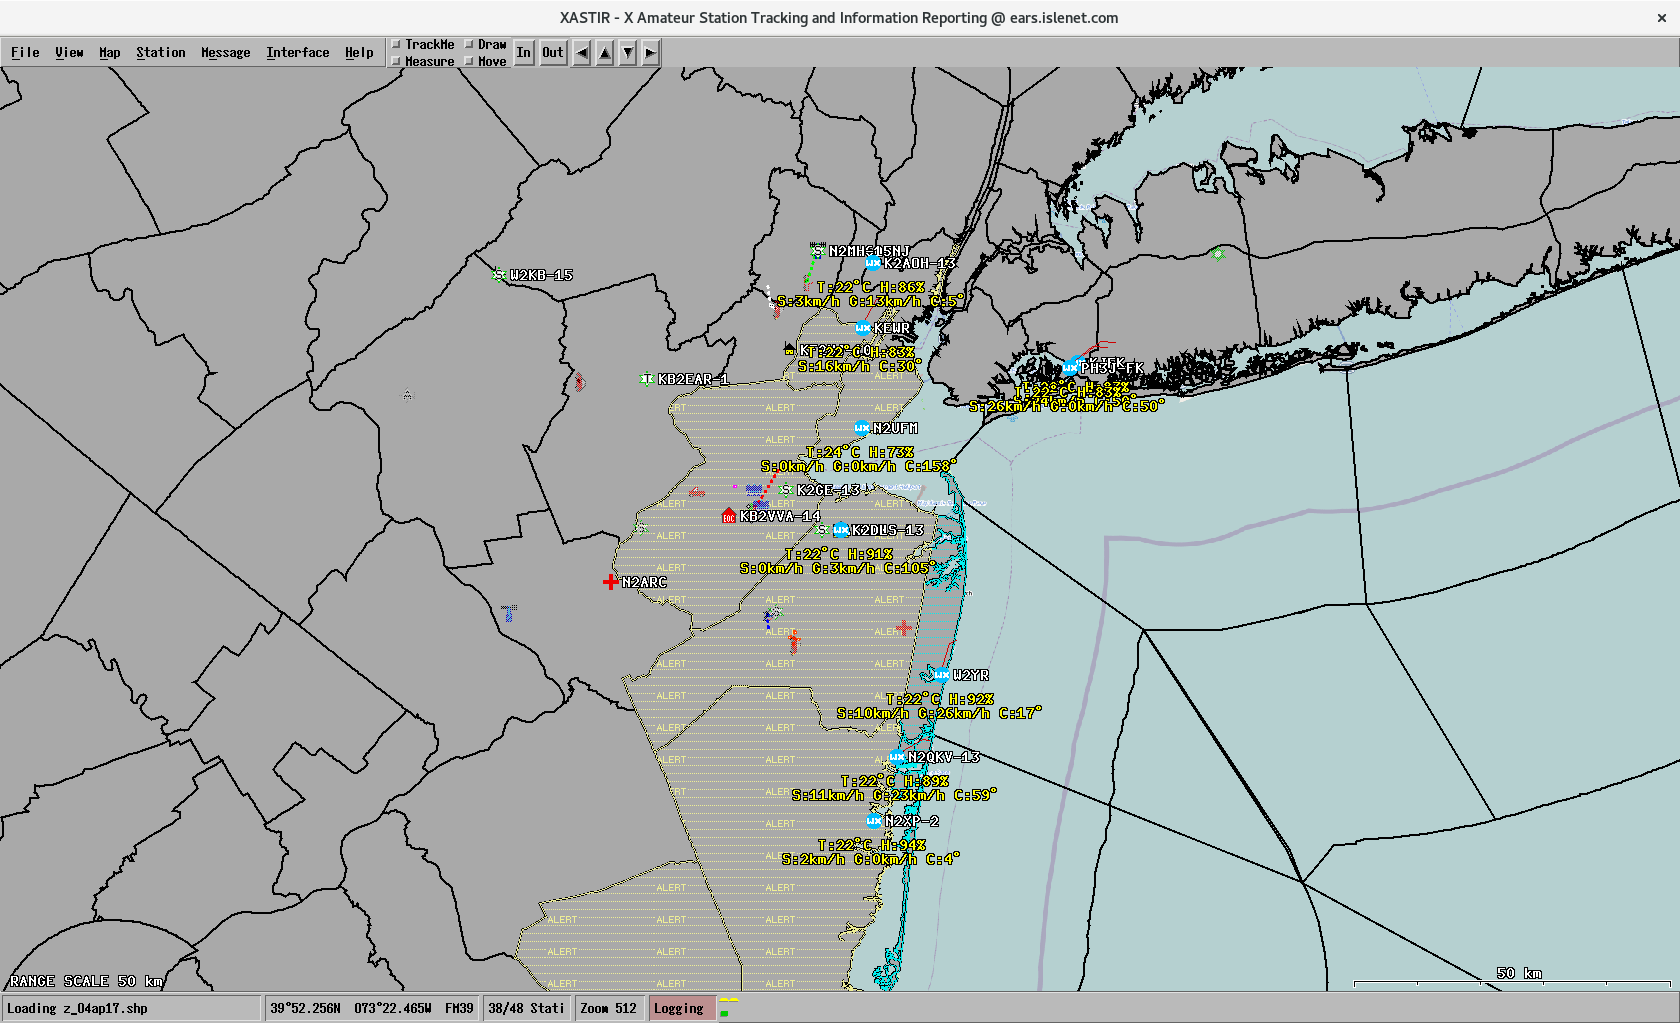
This is what my alerts look like after being iGated to APRS-IS. They also go out over RF to the region. I can even map the alerts on an APRS GUI such as Xastir.
Weather alert map @ K2DLS-13 during Hurricane Jose
If you’d like to become an APRS weather alert station for your county, consider running aprx and noaacap. You’ll need a 2 meter transceiver, a TNC (hardware or virtual), and an antenna to tranmsit the data feed via RF. Help keep fixed and mobile stations, especially those using radios with APRS display screens, well informed and situationally aware. You don’t have to run a high profile digipeater. If your APRS signal is receivable by a local digipeater, you could even use an HT, a sound card interface, and an RPi to assemble a low cost station and provide this valuable local service via amateur radio.
A common concern of those running applications on a Raspberry Pi is SD Card exhaustion. It seems that after some amount of write activity, some SD cards fail to record further data. I first noticed this on an APRS system when system updates disappeared upon reboot.
The systemd journal is a useful tool that has largely replaced the syslog in modern Linux systems. It can also be redirected from the SD card to volatile memory. Note that by changing this you will reduce the number of SD card writes but your journal will not survive reboots.
The key to changing the storage location of the journal is found in /etc/systemd/journald.conf. Look for this line:
[Journal]

#Storage=auto
Uncomment the line by removing the #. Change auto to volatile:
[Journal]

Storage=volatile
Restart the systemd journal and your journal data will be written to /run/log, which is memory resident.
sudo systemctl restart systemd-journald.service
Only use good quality SD cards such, such as the SanDisk Ultra Class 10 memory cards. I recently had one that failed but was pleased when the SanDisk warranty program replaced the card at no charge.
The K2DLS DV4mini image for the Raspberry Pi 2 and 3 has been updated to Raspbian Stretch. The DV4mini client and BMXTG 1.3 start automatically upon boot. VNC has been updated to RealVNC. Both VNC and ssh are started by default.
The installation fits nicely on an 8 GB SD card and it looks great on my 7″ touchscreen display.
The default password for the pi user is “raspberry” — please change it immediately!
Between 1600 – 2015 UTC on August 21, 2017, as the solar eclipse swept across the nation, I captured much of the lower 2 MHz of the radio frequency spectrum. I used a Microtelecom Perseus SDR, a 130′ inverted L with four radials, and lots of disk space. In doing so, I have created a permanent record of this portion of the RF spectrum during the solar eclipse.
I am making the spectrum capture files available for your analysis and research. Each file contains a 5 minute segment. If you download a group of files, they will play in succession.
You can use the demo version of the Perseus software or any other software that can read the Perseus data, such as Linrad or HDSDR. You cannot use just an audio player to play the files, even though they have .wav extensions.
Should you perform any analysis or otherwise make use of the files, I’d like to hear from you in the comments below.
Special thanks to Jav, K4JH, for donating the original hosting site and bandwidth for this effort and to the Internet Archive for their work in preserving content.
I’ve added BMXTG to Github and updated it to version 1.3. File locations have been formalized for consistency and I’ve created a .deb package for easier install.
Brandmeister XTG Dialer v1.3 by K2DLS
If you have a running DV4mini build and want to add BMXTG, grab the .deb file from the link in the README.
To install:
sudo dpkg -i bmxtg-1.3.deb
After installing, copy the desktop file to your Desktop directory. This will make the desktop icon available.